The charm of craft beer lies in its diversity of flavor, small batches, and strong personality. But for every brewer moving from homebrewing to commercial production, the first hurdle isn’t the recipe — it’s the equipment. How many vessels for the brewhouse? Conical fermenter or flat-bottom? Is a Brite tank a necessity or a luxury? How should the temperature control system be configured?
This article will answer all the core equipment questions for nano and micro breweries in one place.
1. What Size Brewhouse Suits You? Defining Nano and Micro Breweries
Before selecting equipment, first define your scale and positioning.
A nano brewery typically produces no more than 3 barrels (approx. 350 liters) per batch, with an annual output under 100 barrels. It is designed for small-scale, flexible production and is ideal for startups, experimental brewers, and restaurant owners who want an on-site taproom. Nano brewhouse equipment is compact, relatively simple to operate, and the investment threshold is much lower than that of a microbrewery or commercial brewery. A typical configuration includes a 1-3 BBL (100-500 L) brewhouse, using electric or steam heating, paired with 200-1000 L fermenters. The overall footprint can be contained within 100 square meters.
A micro brewery takes the next step, with batch sizes usually between 500 L and 5000 L. A 1000 L system is the most common standard specification in the global craft brewing industry, capable of producing 2-3 tons per day while retaining the process control precision required by craft beer.
Quick Reference: Output and Scale
| Type | Batch Size | Annual Output Reference | Suitable Scenario |
|---|---|---|---|
| Nano Brewery | 100-500 L | <100 BBL | Taproom, experimental brewing, market validation |
| 소규모 양조장 | 500-5000 L | 100-2000 BBL | Regional distribution, craft beer brand |
| Commercial Brewery | >5000 L | 10,000+ tons | Large-scale industrial production |
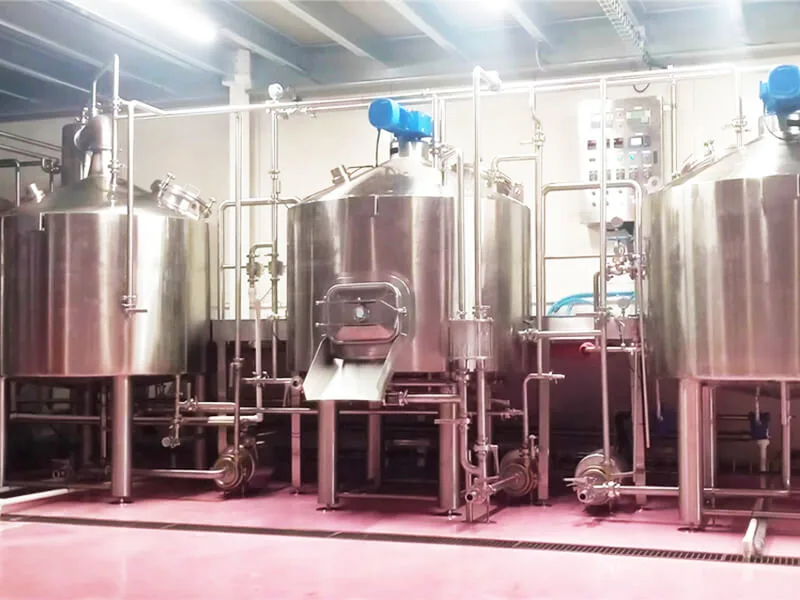
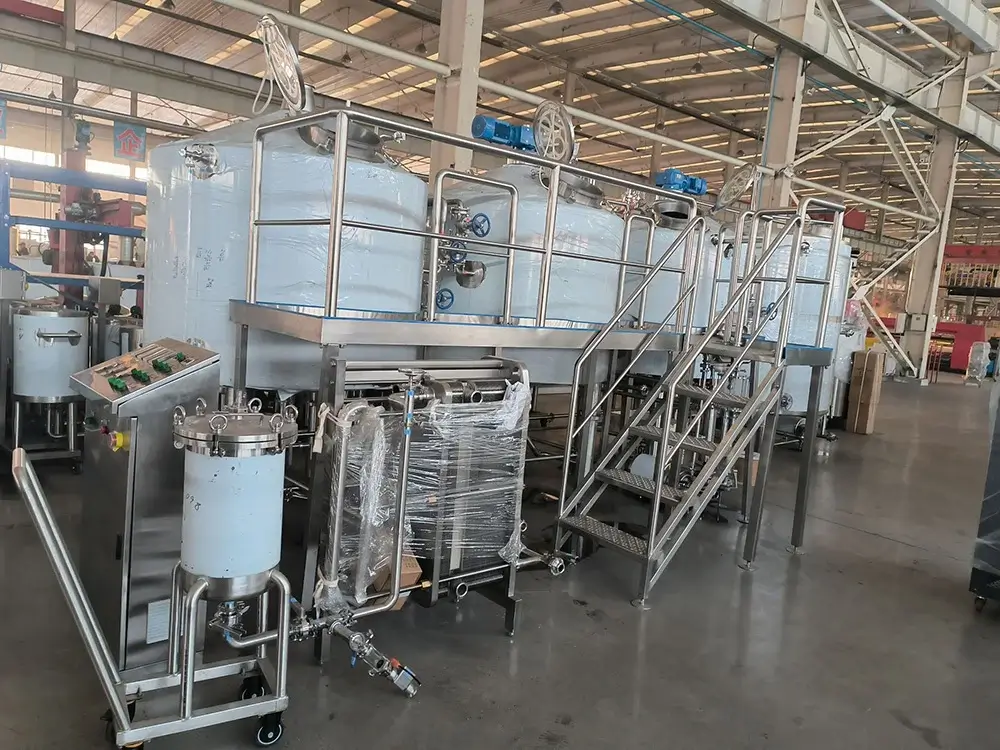
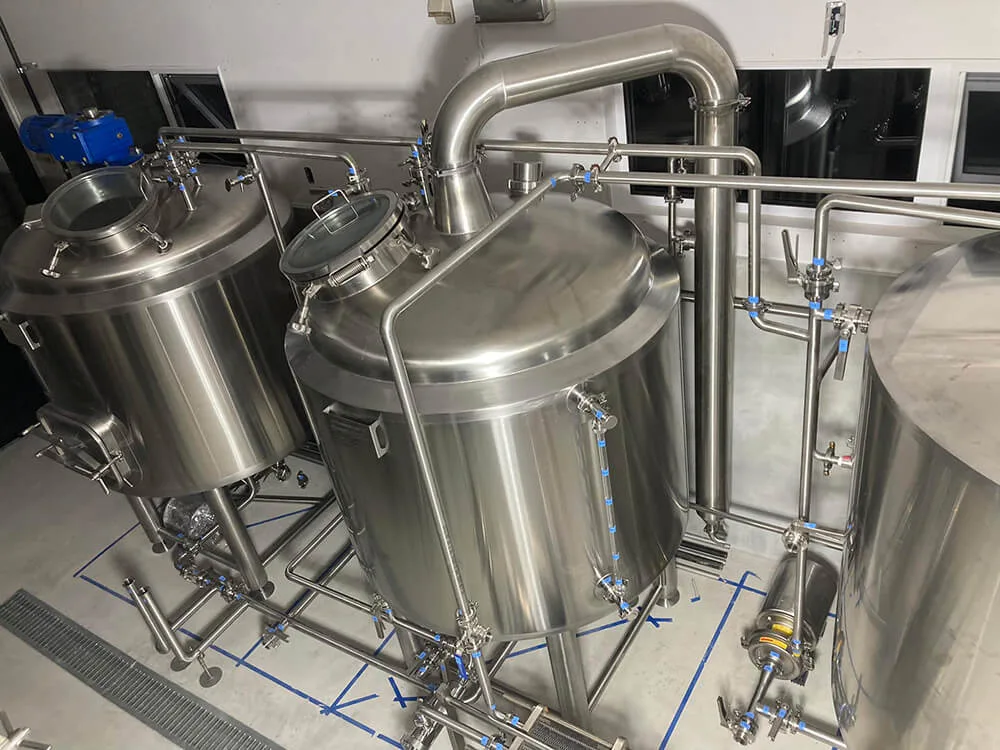
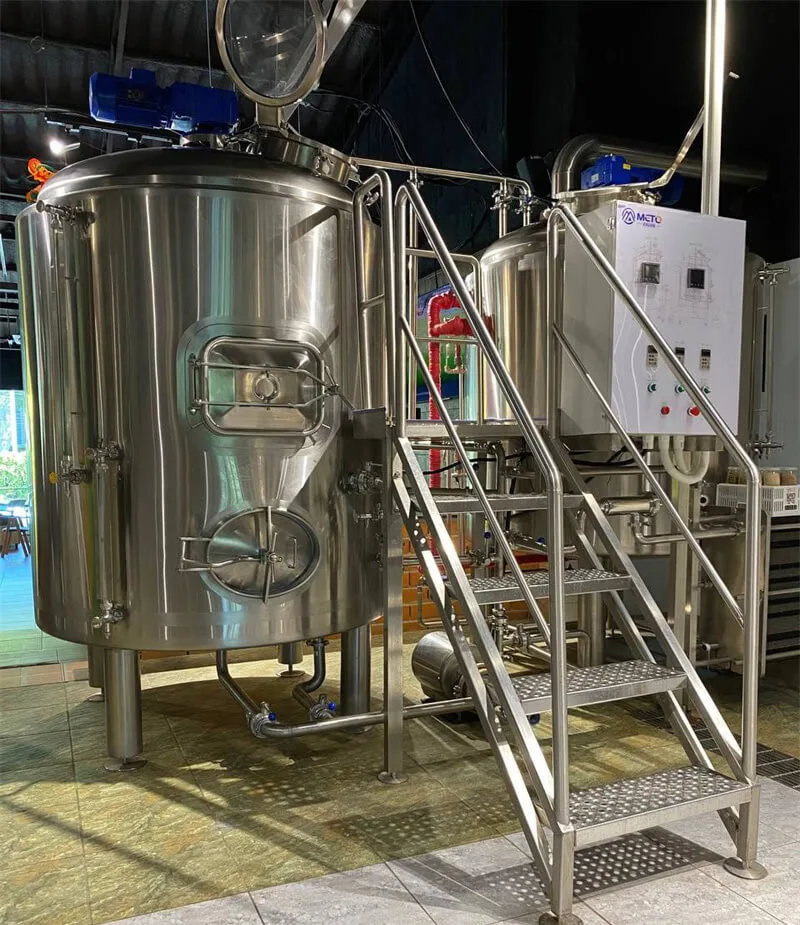
2. Two-Vessel vs. Three-Vessel: The Design Choice for Your Hot Side System
The Hot Side is the “engine room” of the brewhouse — where malt milling, mashing, lautering, boiling, and whirlpooling take place. The design of the hot side directly impacts mashing efficiency, wort quality, and production efficiency.
Two Mainstream Configurations
Two-Vessel System (often called a two-vessel, three-function system) is currently the most widely circulated solution. It has only two tanks, but through a stacked or dual-purpose design, it achieves three functions: for example, one vessel handles mashing and boiling, while the other handles lautering in the upper section and whirlpooling in the lower section (or similar combinations).
장점: Small footprint, low investment cost, easy to operate. For brewery taprooms where space is at a premium, a two-vessel system is the first choice.
제한 사항: The batch output should not be too high; it is recommended that the effective volume does not exceed 1 ton. Continuous production across two or more batches can lead to vessel occupation conflicts, affecting overall efficiency.
Three-Vessel System completely separates mashing, boiling, and whirlpooling into distinct vessels. The configuration is typically: Mash Tun + Brew Kettle + Whirlpool Tank (or an integrated hot liquor tank).
장점: Each process step runs independently, allowing for continuous production (while one batch is mashing, the previous batch can be boiling simultaneously). The wort is cleaner, making it more suitable for scenarios where 2-3+ batches are brewed per day.
Seasoned brewers in online communities advise: at 200 L or below, use at least a two-vessel system; between 300 L and 1000 L, use a two-vessel three-function system; above 1000 L, you should seriously consider three vessels or even four.
How Hot Side Design Impacts Mashing Efficiency and Wort Quality
The hot side design not only affects efficiency but also directly determines wort quality:
- Heating surface affects mashing uniformity: When adding a heating jacket to the mash/lauter tun, if the heating area is too small (e.g., the jacket cannot be installed on the bottom), localized overheating or uneven heating can easily occur during mashing, affecting extract yield and wort composition.
- All-in-one system traps: While an all-in-one brewing system saves money and space, it often results in lower extract efficiency, difficulties in cooling wort, inconvenient operation, and high consumption of electricity, water, and labor, making it hard to consistently produce excellent beer. Multiple experienced brewers explicitly advise against them, precisely because the severe process crossover limits quality control before fermentation.
- Wort lautering optimization: The bottom design of the lauter tun also impacts yield — conical bottom tanks are easier to fabricate and cheaper but yield less wort; flat-bottom designs filter faster and achieve higher wort yield. A false bottom that is easy to disassemble is more conducive to cleaning and maintenance.
Recommendation: For a nano/microbrewery starting out, the two-vessel system offers the best cost-performance ratio. If your production is above 500 L and you need to brew more than 3 batches per week, consider a three-vessel system.
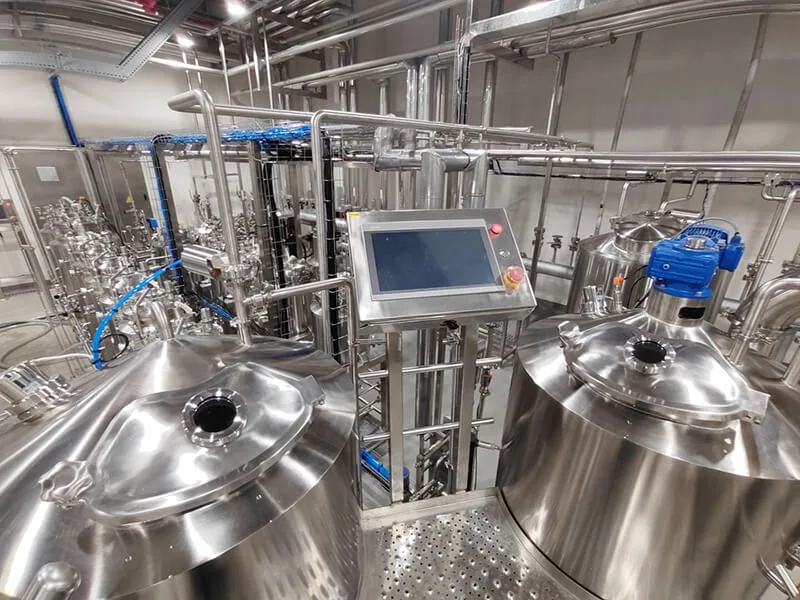
3. Essentials for Fermentation: How to Choose the Right Fermenter?
Fermentation is the core link that determines beer flavor and batch-to-batch consistency. Choosing the right fermenter is even more critical than choosing the mash tun.
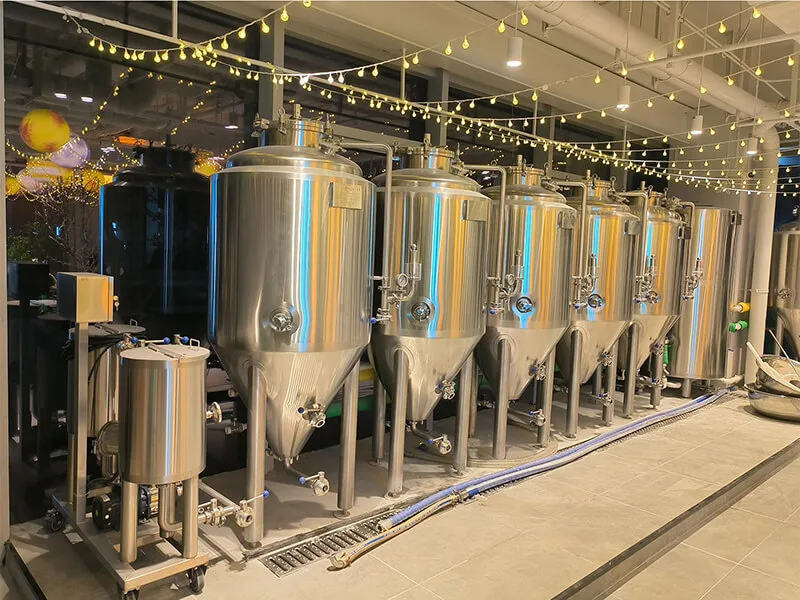
Conical Fermenters: The Industry Standard
Cylindroconical fermenters (conicals) have become the standard configuration in the global beer industry. The bottom is conical at a 60°-80° angle, with a cylindrical top structure. The tank height is usually 2-4 times its diameter.
Core advantages of the conical design:
- Precise yeast management: Yeast and hop debris naturally settle in the cone and can be discharged at any time through the bottom valve without disturbing the beer above.
- More accurate temperature control: The outer wall of the cone also features a cooling jacket, allowing independent cooling of the settled yeast to prevent autolysis, which produces off-flavors.
- Higher cleaning efficiency: During CIP (Clean-in-Place), sediment can be completely discharged, resulting in shorter cleaning times and more thorough residue removal.
- Enables “Unitank” operation: Fermentation and cold conditioning can be completed in the same tank, eliminating the need for transferring, which reduces oxygen pickup and contamination risk.
For small systems between 100 L and 5000 L, the key design point of a fermenter lies in its temperature control structure. A high-quality fermenter is constructed of four layers from the inside out: inner shell → glycol jacket → polyurethane insulation → outer cladding. The jacket coverage area and the uniform foaming of the insulation directly determine temperature control performance and energy consumption.
Practical Design Choices: Top Manway or Side Manway?
- Top manway: Does not sacrifice jacket area, resulting in more uniform temperature control, but requires sufficient ceiling height. The tank top can accumulate dust.
- Side manway: Easy for operators to enter and exit for maintenance, suitable for sites with low clearance, but sacrifices some jacket area, which may affect the temperature control performance of smaller tanks (100-500 L).
Yeast Strategy and Fermentation Method
Conical fermenters require the use of flocculent yeast strains that settle well for harvesting and reuse. For a nano brewery, we recommend the “unitank” fermentation process (where primary and secondary fermentation occur in the same conical tank), which significantly reduces equipment investment and operational complexity.
Fermentation temperature is precisely controlled via a glycol circulation system. Temperature affects not only fermentation speed but directly influences the final beer’s flavor complexity and consistency. Every 1°C change alters the yeast’s ester production capacity, which in turn affects the finished product’s flavor profile.
4. Do You Need a Brite Tank, or Can You Carbonate in the Fermenter?
This is a question that nano and microbrewery operators frequently struggle with.
The Unique Function of a Brite Tank
A Brite Tank (Bright Beer Tank) is the “finishing station” after fermentation, dedicated to three tasks:
- Clarification: Allowing residual yeast and protein to settle naturally at low temperatures, making the beer crystal clear.
- Carbonation: Injecting CO₂ into the beer through a carbonation stone to precisely control the carbonation level. A Brite tank is designed with a dedicated carbonation port and sight glass, features that a standard fermenter lacks.
- Buffer for packaging: Acting as a buffer tank before filling, bridging the rhythm between fermentation and kegging/bottling/canning.
While fermenters handle an active biological process (yeast converting sugar into alcohol), the Brite Tank focuses on the “finishing touches” — ensuring the final product’s clarity, carbonation level, and packaging readiness. Although they look similar, they have structural differences: Brite tanks typically have a flat or shallow cone bottom and a higher pressure rating, specifically designed for carbonation and counter-pressure filling.
Can You Skip the Brite Tank?
Yes, but there is a cost. It’s indeed feasible to use a conical fermenter for conditioning and carbonation, but it brings these limitations:
- Fermenter occupation: During cold conditioning and carbonation, the fermenter cannot be used for the next batch of production, effectively halving your capacity.
- Reduced carbonation precision: The fermenter’s core design is not carbonation; pressure control accuracy and CO₂ distribution uniformity are inferior to a dedicated Brite tank.
- Compromised clarity: Completing the entire process in one tank results in less thorough sediment removal, leading to relatively lower beer clarity.
Recommendation: If you produce no more than 1-2 batches per week and are pursuing extreme cost control, you can temporarily omit the Brite tank. However, if you plan to do keg distribution, bottling, or canning for off-site sales, a Brite tank is almost mandatory — it ensures that every batch leaving your brewery is consistent in clarity, carbonation, and flavor.
5. Practicality Map: How to Choose Among Four Heating/Cooling Solutions?
Temperature control runs through the entire brewing process. From heating during mashing to cooling during fermentation, the chosen solution directly impacts equipment investment, operational costs, and control precision.
Heating Solution Comparison
| 가열 방법 | Best For | 장점 | 단점 |
|---|---|---|---|
| 전기 난방 | No steam supply, small/nano breweries | Simple installation, low investment | Relatively slower heating, high cost at large scale |
| 증기 난방 | Medium+ scale, high-frequency production | High thermal efficiency, fast heating | Requires boiler room, strict safety regulations |
| Steam Jacket | Mashing/boiling needing uniform heat | Large heating area, good uniformity | Requires steam source or glycol loop |
| Direct Fire | Very small/homebrewing | Simplest, zero auxiliary equipment | Difficult to control temperature precisely |
For most nano/microbreweries (under 500 L), electric heating is the most practical choice — no steam boiler required, directly using electricity to heat the mash tun and kettle. When output exceeds 1000 L and you need more than 2 batches per day, the efficiency advantage of steam heating becomes apparent.
Cooling Solution: The Glycol Circulation System as the Main Player
On the cooling side, a glycol circulation system is the industry standard. The working principle is simple: a non-toxic propylene glycol-water mixture is cooled by a chiller unit, then pumped through insulated pipes to the jackets of fermenters and Brite tanks, absorbing heat before returning to the chiller to be re-cooled, forming a closed loop.
Key parameters for a glycol system:
- Glycol temperature setting: The glycol temperature is typically set about 6°C lower than the target tank temperature. Specific settings need to consider the local minimum ambient temperature in winter.
- Chiller sizing: Calculation is needed based on the number of fermenters, total volume, and maximum cooling load (the demand for cooling hot wort after the heat exchanger into the fermenter).
- Pipe insulation: Both supply and return lines must be well-insulated; otherwise, significant cooling loss occurs, causing energy consumption to spike.
Quick Selection Guide: For systems under 500 L, choose electric heating + glycol cooling (with an air-cooled chiller). For systems over 1000 L producing more than 2 batches daily, consider steam heating + glycol cooling.
6. Control, Safety, and Sanitation: The Details That Drive Uptime
A good system relies 30% on the tanks and 70% on the supporting elements. The following details determine whether your brewery can run consistently and stably.
제어 시스템
Modern microbrewery systems often come with a PLC-based automatic control system, supporting recipe storage, automatic step mashing, and temperature curve control. For a nano brewery starting out, a semi-automatic setup (automatic temperature control + manual valves) can significantly reduce costs while preserving sufficient process control capability.
Safety System
- CO₂ Monitoring and Ventilation: CO₂ produced during fermentation is a silent killer. Fermentation areas and cold rooms must be equipped with CO₂ concentration monitors and alarms, with forced ventilation guaranteed.
- Pressure Relief: Every pressure vessel (fermenter, Brite tank) needs a Pressure Relief Valve (PRV) to prevent over-pressurization and explosion.
- Explosion-Proof Electricals: If using a steam system or gas equipment, electrical components must meet the appropriate explosion-proof rating.
Sanitation and CIP System
Sanitation is the lifeline of beer quality. A Clean-In-Place (CIP) system is essential infrastructure for a microbrewery:
- Core components: CIP pump + chemical tanks + spray balls (installed at the top inside each vessel).
- Cleaning sequence: Pre-rinse → Caustic wash (removes organics) → Intermediate rinse → Acid wash (removes scale/beer stone) → Final rinse → Sanitization.
- Recommendation: Even for small 100-500 L systems, at least equip a mobile CIP cart. Poor cleaning is the number one source of off-flavors.
7. Packaging and Service: Kegging, Carbonation, and a Clean Beer Line
Well-made beer needs an appropriate packaging system to reach the consumer.
Kegging System
For a microbrewery, kegging is the most economical packaging method:
- Keg Washer: A semi-automatic, two-station keg washer is designed for small-scale use, capable of performing full cycles: residual liquid discharge, water rinse, caustic wash, hot water rinse, steam sterilization, and CO₂ purging.
- Filling Equipment: Paired with counter-pressure filling, filling under CO₂ back pressure minimizes dissolved oxygen pickup.
Bottling/Canning
If you plan on retail sales or distribution, a small filling line is necessary:
- Semi-automatic line: Manual bottle loading + counter-pressure filler + manual capper, output of 200-800 bottles/hour, investment of 14,000−14,000−55,000, suitable for startup breweries.
- Automatic compact line: Automatic bottle unscrambling → CO₂ flushing → counter-pressure filling → automatic crowning/capping → inline inspection, output of 1000-3000 bottles/hour (or 500-2000 cans/hour).
Craft beer is extremely sensitive to oxygen. Filling must adopt counter-pressure filling methods with a CO₂ back-pressure system to minimize foam and dissolved oxygen. All product-contact parts should be made of 316L stainless steel with a surface roughness of Ra ≤ 0.4 μm, complying with food safety standards.
8. Floor Plans and Budgets: Opening a Brewery Without Costly Redos
Golden Rules of Floor Plan Layout
Even for a nano brewery, the layout needs to be planned in advance to avoid costly reconfiguration later due to insufficient space:
- Brewing Area: Close to water source, drainage, and ventilation. Keep at least 3 feet (0.9 m) of aisle space between fermenters for operation and maintenance.
- Fermentation & Cold Storage Area: Centralized glycol piping runs, fermenters arranged compactly but with guaranteed access for CIP operations.
- Utility Area: Electrical supply lines, steam piping (if applicable), compressed air. Located away from the brewing area but with piping kept as short as possible.
- Cold Room & Packaging Area: Low-temperature storage for finished products, adjacent to the filling area.
- Cleaning Area: The vicinity of the CIP system must have good drainage and secure chemical storage conditions.
When designing your floor plan, be sure to adopt a modular mindset, reserving expansion zones to easily add more fermenters or Brite tanks in the future.
9. Scalable Brewing Equipment Packages: Supporting Growth from Nano to Commercial Brewery
Smart entrepreneurs consider expansion possibilities from the very beginning.
Modular Design Principles
- Brewhouse System: Start with 2 vessels, reserving interfaces for upgrading to 3 or 4. Well-designed brewhouse systems from reputable manufacturers support modular vessel additions — you can start with 3 vessels and upgrade to 4 or 5 as output grows.
- Fermenter Array: Initially configure 2-4 conical fermenters, reserving a multi-port manifold for the glycol supply and return lines to easily plug in additional tanks.
- Control System: Choose a PLC system that supports expansion I/O modules, leaving interfaces for future additional control points.
- Adequate Utility Capacity: The chiller unit’s power and pump flow should be selected based on the final planned production capacity at the time of initial installation, avoiding the replacement costs of insufficient capacity later on.
10. Frequently Asked Questions (FAQ)
Q1: How much startup capital do I need for a nano brewery?
In the domestic market, startup capital can start at about 15,000−15,000−21,000 for a 100-200 L system, while an international 1-3 BBL system ranges from 20,000−20,000−60,000. The funds are mainly for the brewhouse system, fermenters, cooling system, and basic packaging equipment. Site renovation, license applications, and initial raw material purchases are additional.
Q2: Is a 2-vessel or 3-vessel system better? Why is 2-vessel recommended below 200 L?
For systems with a batch size below 200 L, the single-batch cycle is short (mashing + boiling takes about 4-6 hours). A 2-vessel system fully meets the daily production rhythm. In a small space, a 2-vessel saves almost half the footprint of a 3-vessel system and is less expensive. A 3-vessel system is more suitable for batches of 500 L and above, and a brew frequency of 3+ batches per week.
Q3: Can I skip buying a Brite tank? What’s the impact?
Yes, but it’s recommended to have one for distribution/off-site sales scenarios. Without a Brite tank, your fermenter is occupied during conditioning and carbonation, halving production capacity. Carbonation precision and beer clarity will also suffer. If you need to consistently supply kegged, bottled, or canned beer, a Brite tank is highly necessary.
Q4: Electric or steam heating? Which is right for my brewhouse?
Small nano breweries (under 500 L) should choose electric heating first — it is simple to install and eliminates the approval and safety procedures for a steam boiler. For 500 L+ systems requiring 2+ batches per day, steam’s thermal efficiency and heating speed advantages are clear, but a compliant boiler is required.
Q5: How do I size a glycol cooling system?
Calculate the cooling capacity based on the total fermenter volume and maximum cooling demand. The core rule: the glycol temperature is usually set about 6°C lower than the target fermenter setpoint. If local winters are cold, the glycol setpoint may need further lowering. It is recommended to consult equipment suppliers for a professional heat load calculation.
Q6: Can I open a brewhouse with less than 30 square meters of space?
There are existing cases in China: a 15-square-meter micro-brewing system with a compact arrangement of an all-in-one brewhouse and independent glycol-cooled fermenters can produce enough craft beer daily to supply a small bar. The key is selecting a modular, stacked design (like a two-vessel three-function system) to fully utilize vertical space.
결론
The essence of a nano or micro brewery lies in “small batches, high quality, and strong character.” Equipment selection should never be a shackle limiting creativity, but a tool that amplifies the brewer’s skill.
Whether you’re starting from a 50 L homebrew kettle in your living room or jumping straight into a 200 L nano system, the core principles remain the same: Plan your scale with the end in mind, select core equipment to ensure quality, and reserve pathways for expansion to embrace growth. May every batch you brew reach the destination you envision, on your craft beer journey.
지금 바로 문의하세요 to discover how our brewery equipment and commercial craft brewing equipment can power your next brewery.