1. Overview: What Commercial Brewing Equipment Delivers
1.1 Defining a Complete Commercial Brewing System
A complete commercial brewing system is basically a production line that takes beer from small-batch, hands-on brewing to consistent, repeatable volume production. It’s much more than a couple of kettles and a few tanks. It’s a full setup that ties together grain handling, mashing, filtering, boiling, cooling, fermenting, maturing, and packaging.
A typical commercial system includes these core pieces: a grain mill, the hot side (mash tun, lauter tun, brew kettle, whirlpool), a plate heat exchanger for cooling, the cold side (fermenters and/or unitanks), temperature controls, a CIP system, all the necessary pipes and pumps, and finally packaging gear. Each part works with the others to turn malt and water into finished beer.
1.2 Real Value for the Operator
For a brewery owner, a well-designed system shows its worth in ways you can measure.
Higher throughput is the most obvious gain. With the same floor space and the same number of people, the right equipment can double or even triple yearly production. When the hot side, cold side, and packaging line are matched properly, nothing sits around waiting for the next step, and overall output climbs.
Consistent flavour is the lifeline of any craft beer brand. Customers buy your brand because they expect the same quality every time. Manual brewing always drifts a bit – a couple of degrees off on mash temperature, sloppy fermentation control, or a poorly cleaned tank that leaves behind spoilage bugs. All of that ends up in the glass. Commercial gear with decent automation, accurate temperature sensors, and standardised cleaning cycles cuts down on human variability. Your flagship IPA will taste the same in January and July.
Lower operating costs show up in several places. Energy use drops when your tanks are well insulated and your heat exchanger works efficiently. Labour cost per barrel goes down because one person can easily run a semi-automated brewhouse. Ingredient use improves – a consistent crush and a proper mash schedule can squeeze out a few more percentage points of yield. Over a year, that adds up to real money.
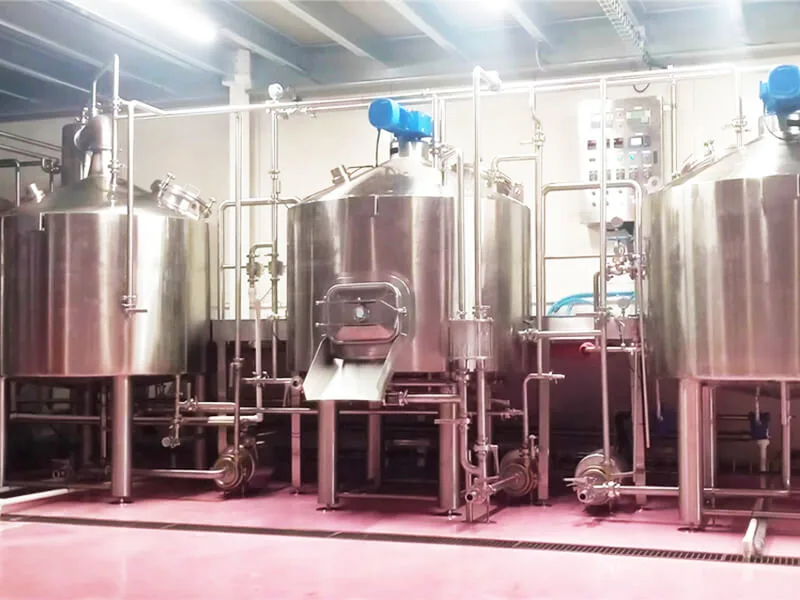
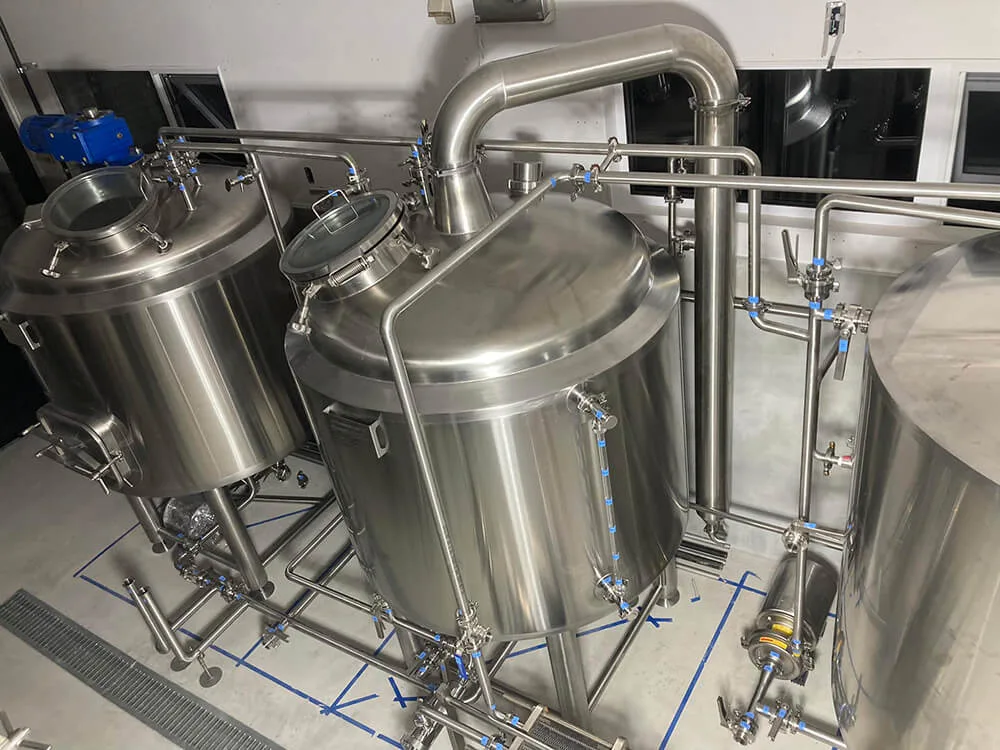
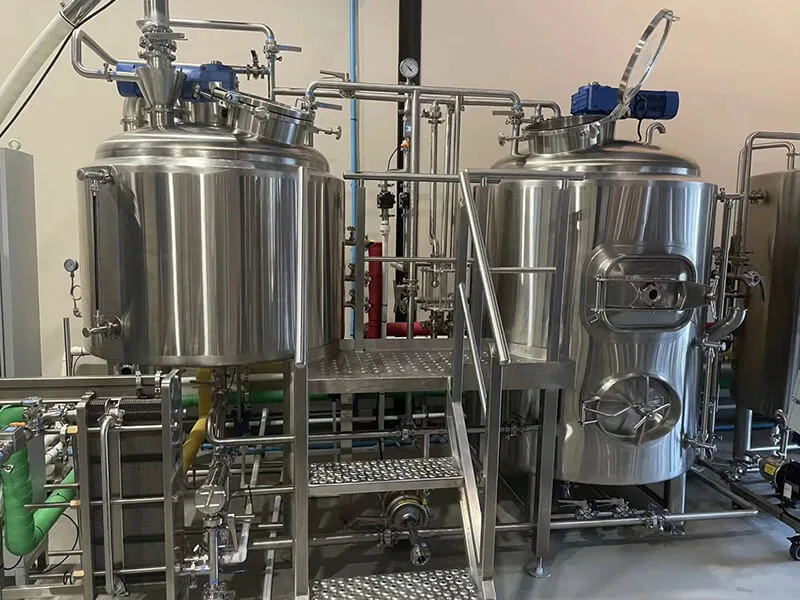
2. The Hot Side: Brewhouse Layout and Process
2.1 Components of the Brewhouse and Design Principles
The hot side – the brewhouse – is where wort gets made before it moves to the cold side for fermentation. A typical brewhouse includes the mill (often on a mezzanine or in a separate room), mash tun, lauter tun, brew kettle, whirlpool, and all the accompanying hot water pumps, valves, pipes, and a control panel. In tighter layouts, the mash tun and lauter tun might sit side by side, while some skid-mounted systems stack the mash tun above the brew kettle.
Good layout design follows a few simple rules.
Straight-line material flow comes first. Grain comes in at one end, goes through the mill, drops into the mash tun, then moves through the lauter tun, brew kettle, whirlpool, and finally out through the heat exchanger – all in one direction. People and ingredients shouldn’t have to cross paths constantly. Spent grain removal also needs a clear plan: will you use an auger and a hopper, or a conveyor that loads directly into a truck? That choice affects floor slopes and how much headroom you need.
Operator convenience directly affects how easy or exhausting the job becomes. The control panel should sit at about elbow height. Manual valves used every brew day should be grouped together on a platform where the brewer can reach them without constantly climbing up and down. The grain loading hatch should be at a comfortable height and have dust collection – otherwise every grain addition kicks up a cloud of dust.
Maintenance access often gets overlooked but matters a lot. Tanks and equipment need enough clearance around them for a person to squeeze through, open manways, disconnect piping, and change gaskets. Pumps need even more room – when a mechanical seal fails, you may have to pull the whole pump head apart right there on the floor.
2.2 Step-by-Step Process and Equipment
A full brewhouse run follows this sequence: milling → mashing → lautering → boiling → whirlpool → cooling. Here’s what each step does and which equipment is involved.
Фрезерование: Malt is poured into the mill, where it passes between two rollers. The goal is to crack open the husk while leaving it mostly intact, and to expose the starchy interior (the endosperm). The mill is the key piece here. Milling quality directly affects extract efficiency – too fine, and the mash will stick or lauter painfully slowly; too coarse, and you leave sugar behind in the spent grain.
Затирание: The milled grist mixes with hot water in the mash tun. Enzymes break down starches into sugars at carefully controlled temperatures. The mash tun’s design – how evenly it heats, whether it has a good stirring system – affects how efficiently this conversion happens. A good mash tun heats uniformly with no hot spots, letting enzymes do their work.
Lautering: After mashing, the sweet wort is separated from the spent grain in the lauter tun. Clear wort drains out through the bottom or side, while the spent grain stays on a slotted false bottom (or gets raked out later). The false bottom’s flatness, open area, and the rake design determine lautering speed and wort clarity.
Boiling: Clear wort goes into the brew kettle and is brought to a rolling boil for 60 to 90 minutes. Boiling sterilises the wort, evaporates water to hit the target gravity, precipitates proteins, and isomerises hop alpha acids. The kettle’s heating method, boil intensity, and agitation all affect final flavour and stability.
Whirlpool: At the end of the boil, wort is pumped tangentially into the whirlpool. The spinning motion creates a cone of trub (coagulated proteins and hop debris) in the centre. How well this works depends on the vessel’s height-to-diameter ratio, the inlet angle, and the flow rate.
Cooling: Hot wort – nearly 100°C (212°F) – is cooled down to fermentation temperature (typically 8–18°C / 46–64°F, depending on the yeast) in a plate heat exchanger. The faster this happens, the lower the risk of infection and oxidation, and the better the cold break formation.
After cooling, the wort is aerated and sent to a fermenter – the start of the cold side.
2.3 Ergonomic Design Benefits in the Brewhouse
A well-laid-out brewhouse makes the operator’s job safer and less physically taxing.
Decks and platforms are built at heights that suit an average person. Stairs have comfortable treads and gentle rises, so carrying buckets or bags up and down isn’t a dangerous balancing act. Lighting is bright enough but doesn’t glare off control screens. Labels on valves and pipes use large, clear type with good contrast. Valves and switches take reasonable force – you never have to put your whole body weight into turning one. Every major pipe and vessel carries a clear label showing what’s inside and which way the flow goes.
These details seem small, but you deal with them every day, every brew. A comfortable workspace lets one person do what might otherwise take two or three.
3. Small Brewery Capacity: Comparing 3.5bbl and 5bbl Nano Setups
For a new craft brewery, 3.5bbl (about 420 litres / 111 gallons) and 5bbl (600 litres / 158 gallons) are the most common entry points. This section focuses on 5bbl as a detailed example.
3.1 5bbl Capacity and Footprint
A typical 5bbl brewhouse produces roughly 600 litres (158 gallons) of wort per batch. Brewing three to four batches per week gives a monthly output of about 7–10 metric tonnes (roughly 70–100 hectolitres) and a yearly output of 80–120 tonnes (800–1,200 hl). With enough fermenters and good scheduling, you can push that higher.
Fermenter capacity must match the brewhouse. A common setup is a 5bbl brewhouse feeding six to ten 5bbl or 10bbl fermenters. More fermenters allow longer maturation and let you run several different products at once.
Footprint: the hot side needs about 15–20 square metres (160–215 sq ft). The cold side (fermenter area) needs another 25–40 square metres (270–430 sq ft), depending on tank count and layout. On top of that, you need space for grain storage, packaging, a CIP area, a mechanical/utility room, and a cold room. A complete 5bbl setup typically requires 80–120 square metres (860–1,300 sq ft) of usable space.
3.2 Business Models That Fit 5bbl
A 5bll system works well for several types of operation.
Brewpub – beer is made and sold on the same premises, poured directly from taps behind the bar. A 5bbl system can support a busy brewpub, turning out three to five batches per week and keeping eight to twelve taps running without running dry.
Multi-location supply – one central brewery supplies two or three owned outlets or franchise locations, delivering in kegs. A 5bbl brewhouse can reliably fill the needs of three to five retail taps.
Wholesale to restaurants and bars – selling kegs to local restaurants, barbecue joints, and pubs. Each account may not take huge volumes, but with a dozen or more accounts, the numbers add up.
Small-batch contract brewing – using idle capacity to brew for other small brands. This requires having the proper licences and being set up to handle flavour changes and allergen cleaning between runs.
3.3 Practical Planning Advice for Start-Ups
Matching hot side to cold side capacity
This is one of the most common mistakes. Brewers spend the budget on a nice brewhouse and then realise they don’t have enough fermenter capacity – the wort has nowhere to go, so they either let the brewhouse sit idle or brew much less often.
A good rule of thumb: total fermenter volume should be 6 to 10 times the brewhouse batch size. For a 5bbl brewhouse, that means 30 to 50 bbl of total fermenter space. In practice, you need several tanks to run in parallel. One batch goes into the fermenter that’s ready today; another batch fills a second tank tomorrow; meanwhile, two or three tanks are already fermenting or maturing. Only then can the brewhouse run at a steady pace without constantly waiting for a free tank.
Seasonal stocking strategy
Beer sales are strongly seasonal. The peak months – May through August – can see two or three times the volume of winter. If you wait until summer to increase brewing frequency, it’s already too late – fermentation and maturation take a fixed amount of time and can’t be rushed.
Instead, start increasing brew frequency in early spring. Fill every fermenter and every maturation tank so you enter the hot season with a healthy inventory. When sales taper off after September, reduce the brewing schedule and use the slower months for deep cleaning, maintenance, equipment upgrades, and pilot batches.
Future-proofing with spare connections
If your business grows – and you hope it will – you’ll eventually need more fermenters, or maybe a larger brewhouse. If you planned for that from day one, the cost and downtime of an upgrade will be much lower.
Practical steps: install extra valves and blind flanges on your main utility headers (glycol, water, compressed air). Leave space in the electrical panel – spare breakers, spare contactors, and knockouts for extra cables. Oversize the chilled glycol loop and the main circulation pump so they can handle another few tanks. Leave empty floor space where new fermenters could sit without having to rearrange everything. The small extra investment up front is nothing compared to cutting and re-welding pipes, smashing concrete, and shutting down production for a week.
4. Brew Kettle Heating: Steam Jacket vs. Electric
Many brewers agonise over this choice. There’s no single correct answer – each method suits different situations.
4.1 Steam Jacket Heating
Steam heating is a mature, proven technology. A boiler generates steam that flows into the jacket around the kettle (or through internal coils), transferring heat through a large contact area.
Преимущества:
- Fast heat-up. A properly sized boiler can push wort from mash-out temperature to a vigorous boil quickly.
- Very even heating. The jacket covers a large part of the lower kettle wall, so heat transfer is gentle and uniform – no local scorching.
- Can serve multiple users. The same boiler can heat the mash tun, supply hot water for cleaning and for the hot liquor tank, and even heat the CIP supply.
Disadvantages:
- High upfront cost. The boiler itself is expensive, and you also need a water softener, piping, safety accessories, and a flue or chimney. Total investment is significantly higher than electric.
- Requires a licensed operator and regular inspections. Pressure vessels are regulated. You need someone qualified to operate and log the boiler, and the boiler must be inspected internally and externally every year. Compliance and paperwork are real.
- Overall efficiency depends on the boiler. An old, inefficient boiler might convert only 60–70% of fuel into useful heat – no matter how efficient your kettle is.
Best for: daily production, breweries that already have a gas line and a boiler room, and operations that plan to grow further.
4.2 Electric Heating
Electric heating uses immersion elements (like a giant version of a household water heater element) or, less often, heating pads attached to the outside of the kettle. Immersion elements are more common.
Преимущества:
- Simple equipment. No boiler, no steam piping, no complex valve stations – just the elements and a controller.
- Small footprint. The elements are inside the kettle; no separate boiler room needed.
- Instant on/off. Push the button and heating starts – no waiting for boiler pressure to build.
- Precise control. Solid-state relays can modulate power smoothly, so you can control ramp rates and boil intensity very accurately.
Disadvantages:
- Slower heat-up. Limited by the electrical service available at your site. The actual power you can put into the kettle is often lower than you’d like, so getting from mash temperature to a boil can take a while.
- Prone to scorching. If the wort is very high in sugar, if there’s poor circulation, or if the element surface temperature is too high, proteins and sugars can burn onto the elements. That affects both heat transfer and flavour.
- More maintenance. Burnt-on residue requires soaking and scrubbing with special cleaners. The elements themselves are consumables – they can corrode or burn out after a year or two.
Installation and energy-saving tips:
- Size your electrical service correctly. The real power draw is often higher than the manufacturer’s brochure suggests, once you account for element life, voltage drop, and safety margins.
- Use off-peak power if available. If your utility offers time-of-use rates (lower price at night), you can do the heat-up or even the whole boil during cheap hours and cut your electricity bill nearly in half.
- Insulate the kettle. This applies to both steam and electric – adding a thick jacket of mineral wool or polyurethane foam around the kettle saves a surprising amount of energy. Many operators skip this, and heat just radiates into the brewhouse.
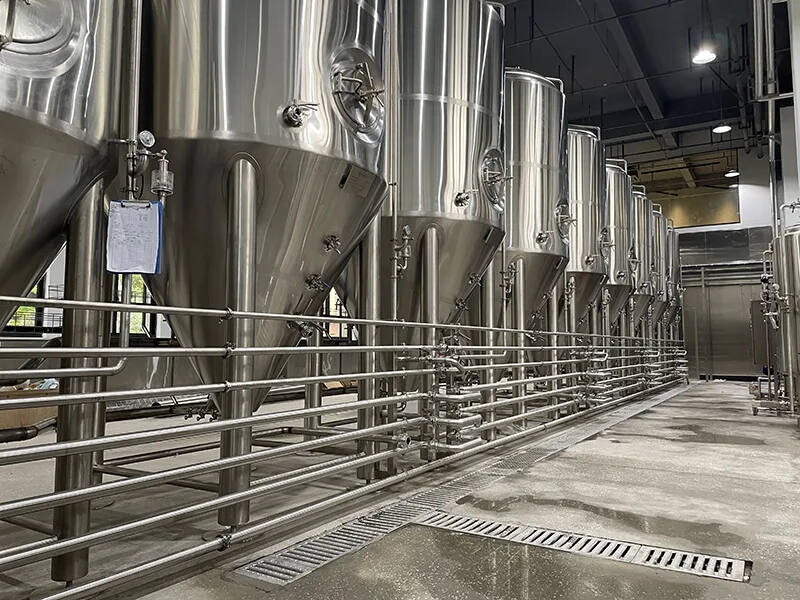
5. Cold Side Tanks: Fermenters vs. Unitanks
The cold side is where fermentation and maturation happen. Choosing the right tanks directly affects beer quality and production flexibility.
5.1 Conical Fermenter vs. Unitank – What’s the Difference?
Conical fermenters are the industry standard. They have a cylindrical upper body and a cone-shaped bottom. The cone angle (typically 60–75°) lets yeast settle and compact at the very bottom, from which it can be discharged through a valve at the cone tip. The angle matters – too shallow, and yeast won’t drain cleanly; too steep, and the tank becomes very tall.
A conical fermenter is used for fermentation only. After primary fermentation and maturation, the beer must be transferred to a bright beer tank (or directly into kegs or bottles). That extra transfer adds some risk of oxidation and infection, but it also means each fermenter can be turned around faster for the next batch.
Unitanks (combined fermenter-bright tank) do double duty. The same vessel handles fermentation and then, after cooling, becomes the bright tank – the beer never moves. One tank does the work of two, saving space and eliminating one transfer.
Which to choose?
- If you make many different products in small batches, unitanks are more convenient – less transferring, less cleaning between products.
- If you make one or two core products in large volumes, dedicated fermenters plus bright beer tanks are more efficient.
- If floor space is tight, unitanks take up less room.
- For cleaning: unitanks need to be cleaned after every batch (because the next batch may be different). Fermenters that are used for the same beer repeatedly can sometimes go two or three batches between full CIP cycles.
5.2 Tank Options and Temperature Control
Options worth paying attention to:
- Jacket area and location. Jackets on the cylindrical section, covering the lower half, are usually enough. For very large-diameter tanks or high ambient temperatures, you may need a second jacket zone. Too little jacket area means slow cooling and a chiller that runs constantly.
- Temperature sensor placement. At least two sensors: one high on the cylinder (to measure the main beer temperature) and one low on the cone (to monitor yeast temperature). A single sensor in the middle will miss the temperature gradient between top and bottom, which can be several degrees during active fermentation.
- Sample valve design. The valve must be easy to disassemble and clean. A sterile sampling valve that can be steamed before taking a sample is even better. Common ball valves have internal cavities that trap residue and are very hard to clean.
- Manway and sight glass. The manway must be large enough for a person to climb inside for cleaning. The sight glass should include a light so you can watch fermentation activity – yeast cropping, krausen, and clarity.
- Pressure relief device. Every fermenter must have a pressure relief valve or bursting disk. This is not optional. It’s a basic safety requirement.
Temperature control design:
Each fermenter should have its own dedicated temperature control loop, rather than several tanks sharing a single controller. Independent loops mean each tank can run its own fermentation temperature profile. Today’s IPA can ferment at 20°C (68°F) while tomorrow’s lager sits at 12°C (54°F) – no conflict.
Cooling is typically done with chilled glycol (a glycol-water mix). The temperature controller opens and closes a solenoid valve to let glycol flow through the jacket. How well this works depends on sensor placement, valve sizing, glycol flow rate, and glycol supply temperature. These need to be matched properly; otherwise you get temperature overshoot or short-cycling (the valve opening and closing too often).
Tank insulation is also critical. If the insulation is too thin, the tank will sweat condensation in summer, the beer temperature will fluctuate, and the chiller will run almost non-stop. The correct approach is a stainless steel outer skin over at least 50 mm (2 inches) of polyurethane foam or mineral wool.
6. Process Control and CIP System
6.1 CIP System Design and Operation
The CIP (Clean-In-Place) system is one of the most underrated but essential parts of a commercial brewery. The idea is simple: cleaning solutions (hot water, caustic, acid, sanitiser) circulate through tanks and piping, scouring away all residue, without anyone having to climb inside.
Design considerations:
A CIP system typically includes one or more supply tanks for cleaning solutions, a circulation pump, a heater, flow meters, conductivity sensors, and automated valves. Pay attention to:
- Flow velocity. Too low, and the cleaning solution lacks scrubbing power; dead legs stay dirty. A minimum of 1.5 metres per second (about 5 feet per second) inside the pipe is a common target.
- Контроль температуры. Caustic wash typically runs at 70–85°C (158–185°F). Acid wash at 50–60°C (122–140°F). Sanitiser at room temperature or a specified temperature. Off-temperature means either poor cleaning or damaged seals.
- Coverage. Every vessel – mash tun, brew kettle, fermenters, heat exchanger, and all pipe runs – must be able to be connected to the CIP circuit. No “hand wash only” dead ends.
- Drainage. Waste cleaning solution must drain completely. Vessel bottoms should slope to the outlet, and pipes should have low-point drains.
Operational best practices:
- Rinse with hot water after every batch to remove most solids.
- A full caustic-acid cycle once a week removes organic and inorganic soil.
- Inspect spray balls every month. If they’re clogged or not rotating, clean or replace them.
- Plan for regular gasket replacement – silicone gaskets harden and lose their seal over time. Change them every six to twelve months on a schedule.
Common problems and prevention:
- Incomplete cleaning leads to infection. Prevention: do regular swab testing of supposedly clean surfaces to verify CIP effectiveness.
- Clogged spray balls create dead zones. Prevention: check them after every CIP cycle, or use self-cleaning spray balls.
- Heat exchanger fouling reduces efficiency. Prevention: back-flush the plate heat exchanger immediately after every brew, and do a chemical clean weekly.
6.2 Piping, Pump, and Fitting Standardisation
Piping, pumps, and fittings are the “plumbing” that connects everything. Standardising them saves a huge amount of headache.
Uniform specifications:
- All tri-clamp fittings should be the same size. The two most common sanitary sizes are 1.5-inch and 2-inch. Choose one (or both) for the whole brewery, and then stock only one size of gaskets, clamps, and blanks.
- Use the same pump model wherever possible. If your hot side uses two pumps and your cold side uses two or three, try to buy identical pumps from the same manufacturer. Then you only need one type of spare parts, and every maintenance person learns only one pump.
- Standardise on one gasket material – silicone or EPDM. Mixing materials can lead to using the wrong gasket in the wrong place.
Example maintenance checklist (adjust to your own operation):
- Daily: listen for unusual pump noise or vibration; check for leaks; verify that manual valves are in the correct position; look for bulges or cracks in flexible hoses.
- Weekly: tighten all tri-clamp clamps; lubricate pump mechanical seal flush systems; inspect strainer baskets for damage.
- Monthly: disassemble and inspect one pump’s mechanical seal (rotate through all pumps over time); replace any gasket that shows wear; calibrate temperature probes and pressure gauges.
- Quarterly: chemically clean the plate heat exchanger; test the pop-pressure of safety valves; clean electrical panel interiors with compressed air.
7. Detailed Equipment Breakdown by Section
7.1 Milling Equipment: Two-Roll Malt Mill
Milling is the first step, and its quality influences everything downstream. The most common design in craft brewing is the two-roll mill.
How it works: Two parallel rollers turn toward each other. Malt drops into the gap between them and is crushed. The gap is adjustable – usually with a handwheel or hydraulic system. A narrower gap gives a finer crush.
How to control extract efficiency:
Gap setting is critical. A typical range is 0.8–1.5 mm (0.03–0.06 inches), depending on malt variety, kernel size, and lauter tun design. The quick test: the malt husks should be mostly intact and flaky; the endosperm should be broken into particles ranging from coarse grits to fine powder, with about 60–70% fine material. If the husks are powdery, the gap is too tight – lautering will be slow or stuck. If there are many large, unbroken chunks, the gap is too wide – extract efficiency will suffer.
Техническое обслуживание:
- Brush off residual powder from the rollers after each milling session.
- Check roller wear periodically – a grooved or scored roller will produce an uneven crush.
- Check belt tension – too loose, and the roll speed becomes erratic.
7.2 Plate Heat Exchanger and Bright Beer Tank
Plate heat exchanger (PHE) : Its job is to cool hot wort from near-boiling down to fermentation temperature quickly. Thin, corrugated stainless plates are stacked together. Hot wort flows on one side; cold medium (chilled water or glycol) flows on the opposite side in the opposite direction. More plates mean more surface area and faster cooling.
Why speed matters: The time from end of boil to cool wort should be as short as possible. There are three reasons: (1) At high temperatures, nutrients in the wort oxidise, creating stale flavours. (2) Slow cooling gives spoilage bacteria a window to grow – even if you pitch yeast afterward, their metabolic by-products already affect flavour. (3) Cold break particles form during cooling; rapid cooling creates fine particles that settle or filter out more easily.
Bright beer tank (BBT) : The BBT holds finished, matured beer just before packaging. It acts as a buffer and a conditioning vessel. After a short rest in the BBT at a controlled temperature and pressure, the beer’s carbonation level stabilises, temperature evens out, and the final product is consistent from first to last package.
Routine checks:
- PHE temperature differential: under normal conditions, the wort temperature drop from inlet to outlet should be within your process target. If the delta shrinks and the cooling water return temperature rises, the PHE is likely fouled and needs cleaning.
- PHE tightness: periodically check the tightening bolts. If you see a leak, shut down and fix it immediately.
- BBT pressure and temperature: too low pressure, and carbon dioxide will break out; temperature swings can affect biological stability.
- BBT interior cleanliness: always verify that the tank has been properly cleaned and sanitised before filling.
7.3 Spare Parts Inventory and Management
Equipment breaks down – the difference is that a prepared brewer fixes it in two hours, while an unprepared brewer waits three days for a courier. Here’s a baseline spare parts list.
Critical spares (keep at least one of each):
- Silicone gaskets in various sizes (tank manways, pipe joints, pump covers) – keep 10–20 of each common size.
- Tri-clamp gaskets – 20 each of 1.5-inch and 2-inch.
- Temperature probes – two or three of the common type (e.g. PT100).
- Pressure gauges – two or three in the required range.
- Pump mechanical seal kits – one or two for each pump type.
- Contactors, thermal overloads, and other common electrical components – two or three each.
Consumables (stock based on usage rate):
- Caustic, acid, and sanitiser for CIP (keep one month’s worth on hand).
- Filter media (diatomaceous earth or filter cartridges) – a few batches’ worth.
- Lubricants, PTFE tape, cleaning brushes.
Inventory management tips:
- Keep a log or spreadsheet showing each spare part, its location, and a minimum quantity.
- Every time you use a part, note it and reorder to bring stock back up.
- Periodically check stored spares for ageing (gaskets harden even on the shelf).
- Know your supplier’s lead time – order well before you run out.
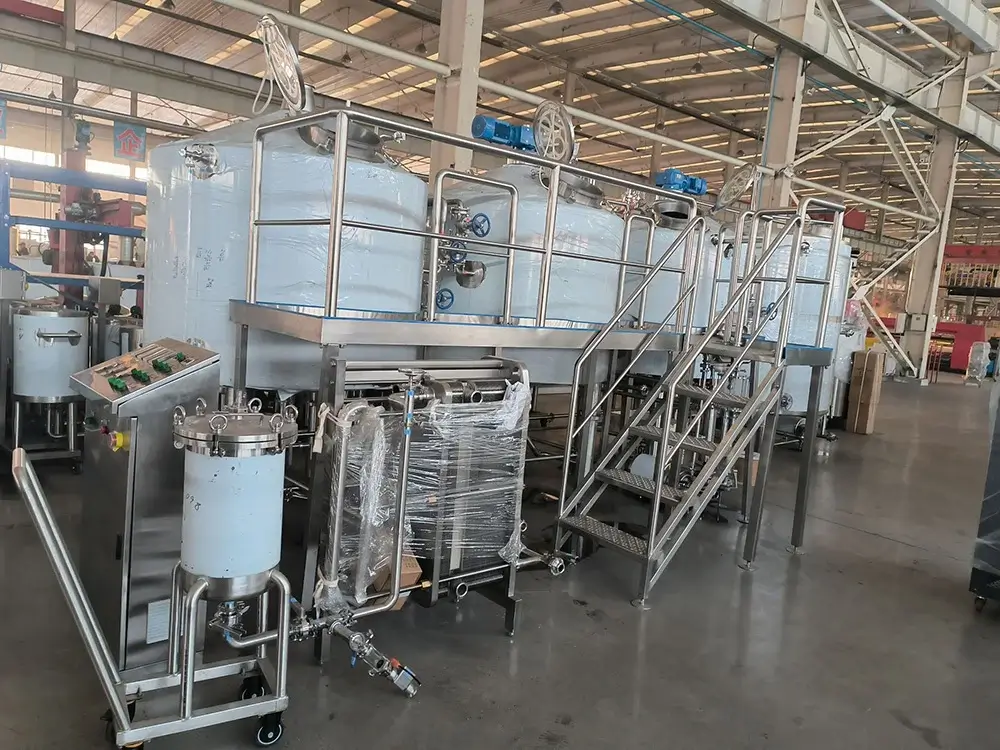
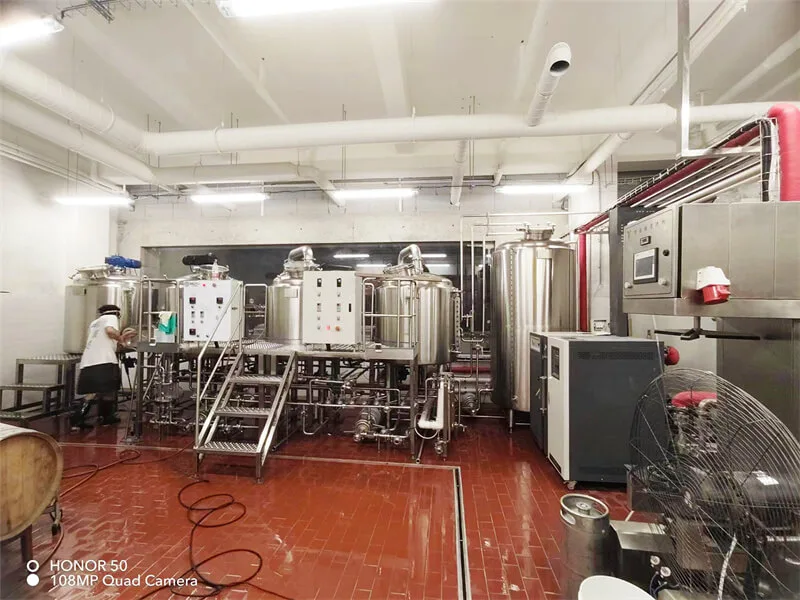
8. Skid-Mounted Brewhouses, Operating Schedules, and Packaging Planning
8.1 Advantages of a Skid-Mounted Brewhouse
A skid-mounted (or “modular”) brewhouse has all hot-side vessels – mash tun, lauter tun, brew kettle, whirlpool, hot water tank, and control panel – mounted on a single steel base (the skid). Piping, valves, pumps, and control wiring are pre-assembled and tested at the factory. When the unit arrives on site, you connect water, power, compressed air, drainage, and the cold side tanks, and you’re ready to start commissioning.
Key advantages:
- Very fast installation. Traditional on-site fabrication and piping can take weeks. A skid can be installed in a day or two.
- Компактная площадь. Vessels are arranged tightly, sometimes stacked, saving floor space.
- Easy relocation. If you move to a larger facility, the whole brewhouse can be lifted onto a truck and moved – just disconnect the utilities.
- Controllable cost. Most fabrication and testing happens in the factory, which is generally cheaper and more consistent than on-site work.
Best for: tenants in leased spaces, start-ups still exploring their business model, and any brewery where floor space is very tight.
8.2 Phased Investment: Kegs First, Canning or Bottling Later
Many new brewers make the mistake of buying everything at once – brewhouse, fermenters, a full canning line – only to find themselves out of cash and with a packaging line that sits idle most of the time. A phased approach is often smarter.
Phase 1: Keg-only sales
This is the lowest barrier to entry. After fermentation and maturation, beer is chilled, carbonated, and transferred into cleaned and sanitised kegs (standard sizes: 20 L, 30 L, 50 L, or 1/6 bbl, 1/2 bbl). The kegs are then labelled and shipped.
The equipment needed is minimal: a keg washer/filler (even a manual unit will do at the start), a CO2 cylinder, and a cold room or cooler. Total investment can be just a few thousand dollars.
Sales channels: serve directly from taps in your own brewpub, or sell kegs to bars and restaurants. Most bar owners already have the gear to dispense from kegs – they just need the keg.
Phase 2: Add a canning or bottling line
Once you have steady sales, a loyal customer base, and a clear brand, consider packaged beer. Cans and bottles extend your reach beyond the bar – into retail stores, supermarkets, and e-commerce.
A small canning line (a few hundred cans per hour) costs tens of thousands of dollars, and it requires more skilled operators than keg filling. So wait until you have a reliable cash flow and a confirmed demand for packaged product. Until then, focus on making the best keg beer you can and building your core customer base.
9. Materials and Stainless Steel Standards
9.1 Choosing the Right Stainless Steel
Food-grade stainless steel is the minimum requirement for commercial brewing. The two most common grades are 304 and 316L.
304 stainless steel (18% chromium, 8% nickel) resists corrosion well enough for most brewery applications. Mash tuns, brew kettles, hot water tanks, and piping are all fine in 304.
316L stainless steel adds 2–3% molybdenum, which improves resistance to corrosion from chlorides (salts). It’s often used for fermenters and for applications where acidic cleaning agents are used frequently, or where water has high chloride content. 316L lasts longer in those conditions, but it costs more.
How to verify grade: Reputable suppliers provide mill certificates. There are also simple chemical test kits for quick checks, but the most reliable approach is to buy from a trusted fabricator and ask for the material certificate.
9.2 Sanitary Fabrication and Connection Design
The grade of steel is only half the story – how it’s fabricated matters just as much.
Internal finish: All product-contact surfaces must be mirror-polished. Typical surface roughness (Ra) is less than 0.8 µm, and often 0.4 µm or better. A smooth surface resists bacterial attachment and cleans easily. Low-end equipment often leaves the surface as-rolled or acid-pickled but not polished – it feels rough to the touch and should never be used for brewing.
Welds: Every weld must be continuous, free of pinholes, and free of cracks. After welding, the weld zone should be ground and polished to match the surrounding base metal’s finish. No rough weld beads, no oxidation colours. Rough welds are perfect hiding places for soil and microbes.
Connections: Use sanitary tri-clamp fittings exclusively – never threaded (NPT/BSP) connections. A tri-clamp consists of a gasket, a clamp, and two ferrules welded to the pipe or tank. The inside surface is smooth and continuous. Threaded fittings have crevices that cannot be cleaned and are no longer acceptable in modern breweries.
Клапаны: Diaphragm valves or butterfly valves are fine, as long as they are designed to be disassembled for cleaning. A standard household ball valve has internal cavities that trap residue – it can’t be cleaned properly and must not be used.
9.3 The Practical Value of Future Connections
This point has appeared several times – here’s a full explanation. “Future connections” means leaving physical attachment points in the system for expansion that isn’t needed yet.
What to do:
- On the chilled glycol header, install extra valves and blind flanges. When you add fermenters later, you tap into these.
- On main product lines, install extra tees and valves to allow more tanks or larger pumps to be added.
- In the electrical panel, leave spare breakers, contactors, and wiring knockouts.
- On the floor, leave empty space where new tanks could sit without having to rearrange everything.
- When running main utility pipes, keep them against walls or columns, leaving the central area open for future equipment.
Why it pays off: Breweries almost always expand. Six months from start-up you may want two more fermenters. A year later you may want a larger brewhouse. If you didn’t plan for expansion, each upgrade will cost you: downtime, cutting and re-welding pipes, smashing concrete, and possibly weeks of lost production. That cost is far higher than the small extra spend on a few valves and a bit more panel capacity at the beginning.
This guide covers the main decisions – from capacity planning and layout to equipment selection and daily maintenance. A commercial brewing system is the backbone of your business; you’ll live with it for years. Taking the time to think through each choice carefully before you buy will save you far more trouble than any last-minute fix later on.
У вас есть вопросы по проекту оборудования для пивоварни? Вы можете рассказать нам Ваши требования к пивоварне, и мы предоставим вам готовое решение в течение 24 часов.